Quick update: Chris and Jesse finished the roof and it looks great!

 So In this post we're gonna do an in depth look at our window installation. Hope you enjoy!
We're going to begin with a rough opening for a window that has the house wrap (white and blue paper to protect the house from water) in place and the first pieces of flexible window flashing (silver tape to really make sure no water gets in)
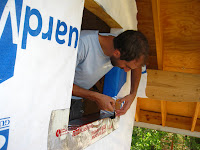
As you can see in the photo above and below Jesse has run a piece of flexible window flashing along the length of the window sill and a couple inches up either side on the exterior.

The next step is to weather proof the intersection of the sill and the jamb (the space left exposed in the pict above)

Jesse takes a piece about 5 inches long and bends it into the corner


he does this on both sides making sure the tape wraps to the exterior and interior as well as up the jamb and along the sill

This part is a little tricky to explain. He takes the piece and lays the uncut half in the middle of the jamb and sill.
Removing just as much of the backing paper as he needs to so the rest doesn't stick until he's got it where he wants it.
 Then he take both legs of the other half and secures one half long the jamb to the exterior and the other half along the sill to the exterior.
Trinity gets the shims (slanted pieces of wood or plastic used to level all sorts of things) Once we've put the shims in place we put the window in and checked it a lot of times with various levels. Then we checked the diagonals to make sure the window wasn't skewed. Finally when it's perfect Jesse put in one screw on the window flange and we checked to make sure the window opened properly. Sorry no free hands for picts.
Once Jesse has put in all the screws into the predrilled holes he begins taping the sides where the flanges meet the house wrap.
Then he lets down the house wrap at the top, adds a little house wrap tape to the top of the window and we're done!!


No comments:
Post a Comment